Blind Hem Stitch: Comprehensive Guide & Step by Step Instructions
What is a blind hem stitch?
The ‘blind hem stitch’ or ‘invisible hem’ is a row of stitching that is barely visible on the right side of a garment’s hem. It is frequently used on men’s and women’s business or formal apparel (cuffs and pant hems). It is also used on finely woven fabrics such as wool suitings, georgette, rayon, challis where a straight hem stitch may affect or detract from a garment’s overall esthetic. In professionally produced garments, super fine thread or monofilament thread are used so that no stitching is visible.
How do you sew a Blind Hem Stitch?
There are 2 ways to create a blind hem—by hand or by machine.
Method 1: Sewing a Blind Hem Stitch
The easiest way to blind hem, is to sew by hand. The process is simple:
1. Mark your hem in the normal fashion.
2. Turn under and press the hem line.

3. Determine the appropriate hem allowance and finish the raw edge. You can finish a raw edge with an overlock/serger machine or with hem tape. Most skirts have a 1 ¾” to 2” hem allowance while dress pants have a 1 ¼” hem allowance. One note when using hem tape: while the product says it is fusible with a household iron and to lay the hem tape over the raw edge of your hem, the hem tape must be handstitched in place to truly secure it. (This was my mother’s go-to hemming tool when she hemmed my father’s work pants. Now she sends them to me so I can run the hems on my machines).


4. Pin hem in place with fine straight pins. It is best to use sharp (not dull) straight pins. When working with finer gauge fabrics use the thinnest pins possible. I use “silk straight pins” when working with fine suitings, satins, and silk fabrics.
5. Thread a hand sewing needle (thinner is better) and tie a knot at the end of the thread. TIP: It is best to work with smaller, more manageable lengths of thread than 1 long piece.
6. Turn garment inside out. Starting at a side seam, anchor your knot in the upper portion of the hem allowance. Next, moving in an evenly spaced manner, “catch” a small amount of fabric on your garment. Then “catch” a small part of your hem allowance. Pull thread thru but DO NOT over tighten it! Continue this process until the entire hem is sewn in place.


7. Once finished hand sewing, press hem.


Method 2: Machine Stitching A Blind Hem Stitch
When sewing a blind hem stitch by machine, the programmed blind hem stitch combines a specific pattern of straight stitching and a wide step zig zag stitch to secure the garment’s hem. To achieve the hem, a special presser foot called a Blindstitch Foot must be used in conjunction with the programmed machine stitch. Some sewing machines come with the foot while some sewing machine manufacturers make it an optional item that can be purchased separately.
1. Mark your hem in the normal fashion.
2. Turn under and press the hem line.
3. Determine the appropriate hem allowance and finish the raw edge.

4.Pin hem in place on WRONG side of garment.
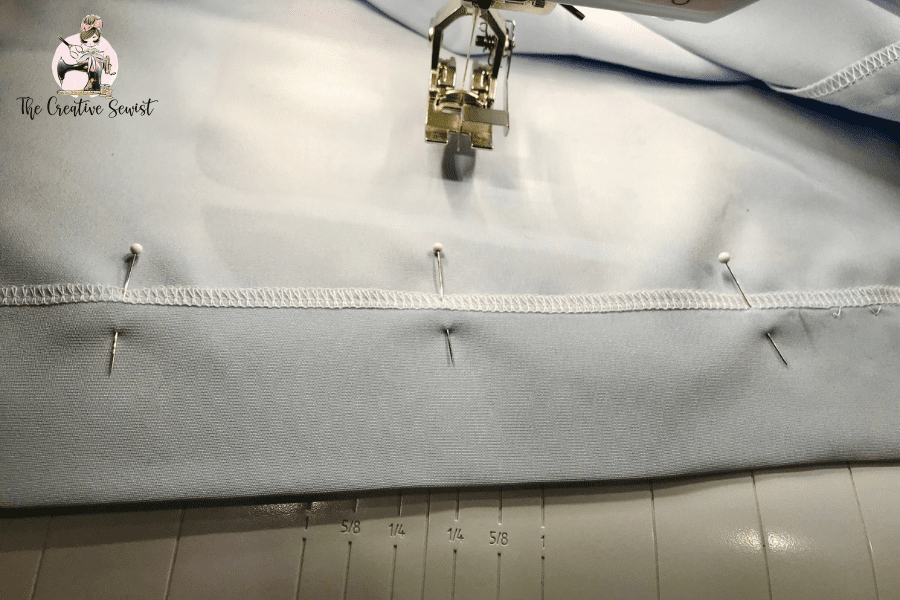
5. Fold back your hem and expose your finished edge. If it is easier for you, reposition the pins along the hem.
6. Thread machine and attach the Blind Hem foot.
7. Carefully place the fold of your fabric under the presser foot so that it touches the blade on the presser foot. (See photo) If possible, start your hem at an inner seam.

8. Adjust your stitch width as necessary so that the needle picks up enough material to hold the hem in place. Most machines default to a 3mm width. You may need to extend that width to 3.5mm-4mm depending on the thickness of your fabric.
9. Sew the hem.
10. Once finished sewing, unfold the hem allowance. Check the hem’s stitching. Did you catch the fabric at all the zig zag step overs? If not, you may need to resew those sections to secure your hem. Repeat steps 5 – 8 where necessary.

11. After you have fully secured the hem, unfold the hem and press.
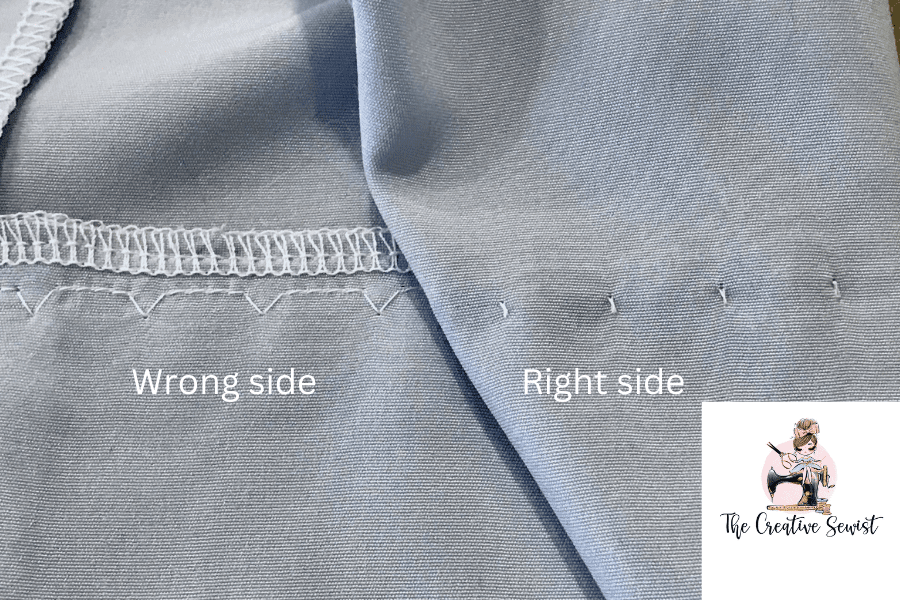
12. Turn garment right side out. Notice that the stitching is not prominent. Some stitches may show and that’s ok.

Is one blind hem stitch method better than another?
No. Sometimes when working with very fine, drapery fabrics like silk chartreuse, it is faster and easier to hand sew.
Can you use a blind hem stitch on all fabrics?
No. Garments, like denim pants, that are made with heavier weight fabrics should not be hemmed with a blind hem.
If this Sewing Tutorial has helped you, please consider sharing it with others on social media. Also, be sure to sign up for The Creative Sewist email list so we can send you helpful sewing advice.
If you have any questions or comments, please leave them below.
Please note: This article does contain affiliate links.
We are a participant in the Amazon Services LLC Associates Program, affiliate advertising programs designed to provide a means for us to earn fees by linking to Amazon.com and its affiliated sites.
There is no additional cost to you when you make a purchase through any of my affiliate links.
CHRISTINE WARREN
Sewing isn’t just my job, it’s my passion. I’ve enjoyed sewing and needle working since I was very young.


