Embroidering Velvet Fabrics like a Pro – 3 Simple & Easy Hacks
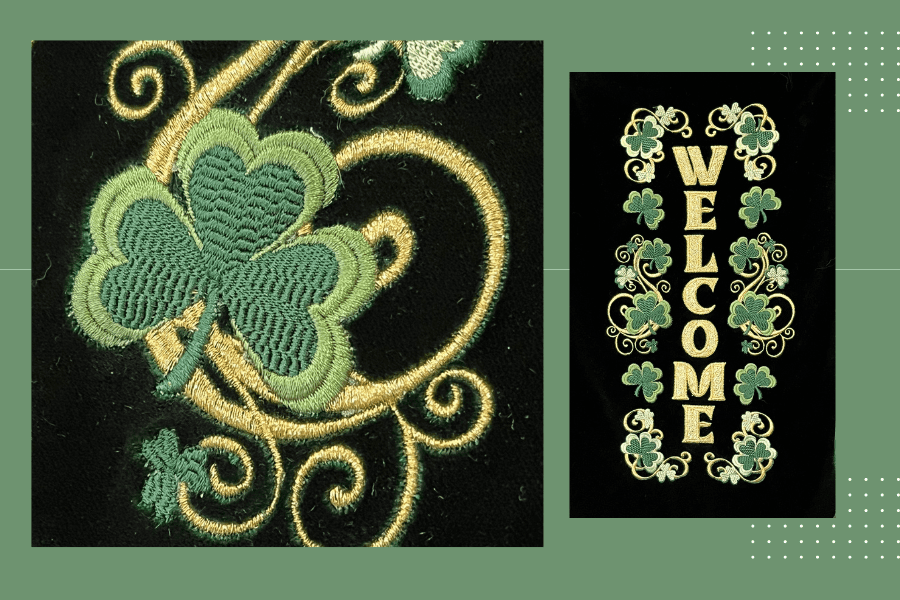
Embroidering velvet fabric can be intimidating for novice sewists. Today, I’m sharing my simple hacks for successfully embroidering velvet fabric.
How to Prepare for Embroidering Velvet Fabric
Before starting, it’s important to properly prep your fabric. If your velvet fabric is wrinkled, lightly steam it from the wrong side to remove the wrinkles. The best way to steam velvet is to hang it and apply the steam from the WRONG side of the fabric. You can do this by using the steam boost setting on your iron if you do not own a clothes steamer. Simply hold the iron vertically a few inches from the velvet and press the steam button. NEVER IRON VELVET!!! You will permanently crush the fabric’s nap.
Once all the wrinkles are out, it’s time to cut your fabric. It’s best to cut a larger piece of fabric than required for your sewing project. For example, my banner’s embroidered design measured 8 inches wide by 15.5 inches long. I cut a piece of green velvet 12 inches wide by 20 inches long. This way, I could use a border hoop clamping system vs. traditional embroidery machine hoops that would crush my fabric. While clamps minimize damage to the nap, some may occur so give yourself good margins incase you need to trim.
It’s also a good idea to remove any lint from your fabric with a lint roller. That way, you have less “fuzzies” stuck on your fabric.

Velvet fabric nap is directional. Make sure you have the ‘shine’ running vertically thru your design.
How to Stabilize Velvet Fabric
Since you cannot use iron-on stabilizers with velvet, you will need to use a sticky back stabilizer like Sulky’s Sticky + Stabilizer. Cut a piece slightly larger than your velvet and apply it to the WRONG side. Tip: The easiest way to do this, is to lay your velvet face down on a clean table. Next, carefully remove the paper from the Sticky back stabilizer. Bend the stabilizer in the shape of a “U” with the sticky side facing the wrong side of the velvet.
Beginning at the center of your velvet, lay and press the stabilizer on the fabric and work your way towards the edges. Be sure to smooth out any possible wrinkles or bubbles. Once the sticky back is applied, flip over the velvet and inspect it for any bubbles or wrinkles. If there are any, simply lift the velvet in the necessary area and smooth the sticky back against the back of the velvet fabric until no imperfections are visible.
How to Hoop Velvet Fabric for Machine Embroidery
Velvet is a fabric that has a “right” and “wrong” direction. The easiest way to determine the direction of the nap is to run your hand down the fabric. The “shiny” nap runs from the top to the bottom (this is what we want), the “dark” side runs from bottom to top. Once you identify the top, place a safety pin as a reference. (This can be removed once your fabric is properly hooped and set.) This way, it’s easier to hoop your fabric in the ‘correct’ direction.

The top of the velvet fabric is hooped. The bottom edge is pinned to the cut away stabilizer.
Just A Note: If you do not own a clamping hoop, you can hoop a traditional embroidery hoop with sticky back stabilizer, carefully remove the paper film from the stabilizer and “stick” your velvet fabric to it. Before starting your embroidery machine, place a piece of heavy weight cutaway stabilizer under your hoop. You can then trim away the excess stabilizer after embroidery is completed.
Best practice is to clamp at least 1 side of fabric to the hoop. Securing the top is best. You can then pin the other end to the hooped stabilizer.
Once you have the fabric clamped in, place a layer of a water soluble stabilizer like OESD’s “Wash Away” Embroidering velvet fabric stabilizer” on top of the velvet. You will need to either slightly lift the clamps and slide it under or pin it in place at the 4 corners. It is extremely important that you trace your design before embroidering to ensure that the machine needle WILL NOT hit any pins that may be holding stabilizer in place. (Once you begin embroidering and have enough stitches down to hold your wash away stabilizer, you can pause the embroidery machine and remove those straight pins).

The final layer of stabilizer you will need is heavyweight cut away stabilizer that is placed under the hoop. I use OESD’s Heavyweight Cutaway Stabilizer and I always have fantastic sew outs. This layer can be hooped or floated under the hoop. (Float means it isn’t hooped. It is laid under a hoop).

Once you have traced the design and are sure that all pins are out of the way, embroider your design.

After completing the embroidery, it’s time to remove the stabilizers.
How to Remove Stabilizers
First, carefully tear away the wash away stabilizer on the top. Try to remove as much as possible with your hands. If there are any tough areas, you can use a silicone brush or dull, flat screwdriver. (I often use my blunt edge tweezers to pick out the water-soluble film).

If there are any pieces left in tiny spots, wet a Q-tip and spot treat those areas until the wash away stabilizer can be lifted and torn away. Most velvet fabrics are dry clean only so it’s important to not saturate them with water. Be conservative with your water usage on velvets.
Next, turn over the embroidery. We’ll trim the cutaway stabilizer with sharp embroidery scissors. To do this, lift the stabilizer from the fabric and trim as close as safely possible to the embroidery. Do not cut your fabric or embroidery.


The last stabilizer to remove is the sticky back. Remove as much as possible by carefully pulling it from fabric and tearing it off. It’s ok if there are areas you cannot remove (like small spaces in your design).

If necessary, you can lightly steam your Embroidering velvet fabric design from the wrong side.
I hope this tutorial helps you with your next velvet embroidery project. If so, please consider sharing it on social media and with your sewing friends. If you have a question, please leave it in the comments below.
Want to learn about more clever embroidery hacks? Check out this blog post. I explain how I fixed a hole with embroidery.
Please note: This article does contain affiliate links.
We are a participant in the Amazon Services LLC Associates Program and its affiliate advertising programs which are designed to provide a means for us to earn fees by linking to Amazon.com and its affiliated sites.
There is no additional cost to you when you make a purchase through any of my affiliate links.
CHRISTINE WARREN
Sewing isn’t just my job, it’s my passion. I’ve enjoyed sewing and needle working since I was very young.


