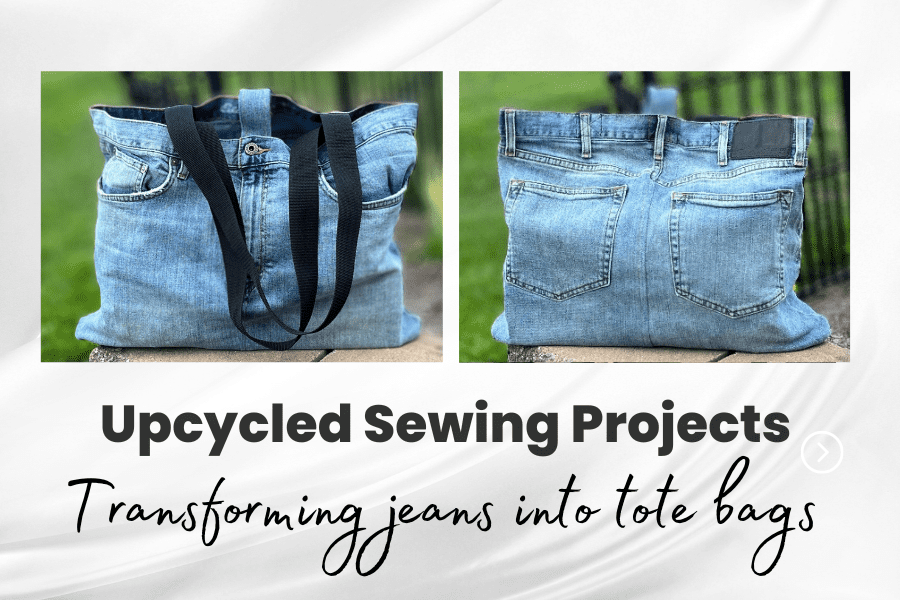
Easy Upcycled Sewing Project: Turn Old Jeans Into Tote Bag
Upcycled Sewing Project in less than 2 hours! Easily make a tote bag out of old jeans.

In this upcycled sewing project tutorial, learn an easy and simple method for transforming an old pair of denim jeans into a functional and useful tote bag. Upcycling not only keeps discarded clothing out of landfills, but it is also environmentally friendly!
Upcycled Sewing Project Materials needed:
1 pair of jeans (preferably no stretch)
1 spool of denim top stitching thread
1 spool of general sewing utility thread
2 yards of 1.5” nylon strap webbing
Upcycled Sewing Project Tools needed:
Sewing machine with straight and buttonhole stitching
Denim weight sewing machine needles
Sharp scissors
Marking pen or tailor’s chalk
Tube Turner Tool
Straight Pins
Iron
Fray Check
Quilter’s ruler
Seam ripper
Upcycled Sewing Project Step 1: Select Jeans

Select a pair of jeans (preferably no stretch denim) with little to no holes in the upper portion. It is especially important that there are no holes in the seat or front. Iron jeans to eliminate wrinkles and press pockets and flaps flat. If there are any holes, consider patching. If you don’t want to use a traditional patch, check out one of these methods for repairing jeans.
Upcycled Sewing Project Step 2: Prepping Jeans
Lay jeans flat on cutting surface. Measure 3” to 4” from top of leg inseam and cut. If you want a deep tote bag, you can measure 5”-6” and make your cuts.


Set pant legs aside.
Upcycled Sewing Project Step 3: Opening Seams
Using a sharp and strong seam ripper, open the remaining pant inseams.

There are usually 2 rows of chain stitching that will need to be removed.

Once you have the seam opened, press the fabric flat.
Upcycled Sewing Project Step 4: Sew Fly Shut
Using denim thread and a zipper foot, sew the zipper flap shut. Make sure the zipper is pulled up to the top prior to sewing. Also, make sure the zipper tab is out of the way when sewing.

Upcycled Sewing Project Step 5: (Optional)
If you do not want any pockets to remain functional, sew them shut using your denim top stitching thread. Be sure to avoid any rivets or added decorations.
Upcycled Sewing Project Step 6: Straighten the Shape
Straighten front and center back seams.

For Front: Draw a straight line from base of zipper to raw edge.
For back: Draw a straight line from base of back yoke to raw edge. (See above photo)
Sew a seam using general utility thread along this line. You may need to open the seam below the zipper to make it lay flat. Once you are satisfied with the seam, trim to ½” to ¾”.


Next, press flat to ONE side. On right side, draw a line ¼” from seam. Using top stitching denim thread sew a seam to hold this seam allowance in place.


Upcycled Sewing Project Step 7: Trim the Hem
Trim the hem so that it is even. You shouldn’t have a lot to trim. You want an even raw edge.

Upcycled Sewing Project Step 8: Finishing the Tote Bag Bottom
There are 2 options for this upcycled sewing project step, and I am demonstrating option 2 in the photos.
Option 1: (for beginners)
Turn bag inside out. Pin the raw edge together and sew a seam with a 5/8” seam allowance. Use general utility thread. To reinforce the bag, sew this seam 2 to 3 times. If you have an overlock machine, finish the edges to extend the life of your tote bag.
Option 2: (for experienced sewists)
From ONE of the pant legs–Cut (2) rectangles of fabric that are 4” wide and measure the length of your bag’s lower edge. WRONG SIDES TOGETHER.
For example, my bag measures 20” wide when laying flat on the table. My rectangle of fabric measures 20” by 4”.
Sew the long sides together using a straight stitch and utility thread. Sew 5/8” from edge. You do not need to interface this rectangle.
Next, we need to place a few marks for accurate pinning placement. First, mark the CENTER of the rectangle on both sides by folding in half (like a book) and marking the fold line with a washable pen or tailor’s chalk. This line will be 4” long. Unfold the rectangle. Now fold the fabric lengthwise (the piece will now be approximately 2” wide) and mark the fold line at the raw edges. You do not need to draw the line the entire length of the piece—just the ends. You should have 4 marks that will now correspond to the center and side seams on the tote bag.
This next step in our upcycled sewing project is easier if you turn the bag inside out. With the right sides of the bag and bottom together, line up these 4 marks with the bag and pin in place. Your “center” marks along the long side will line up with the new center seams you sewed. The rectangle end marks will line up with the side seams. It is important to pin these 4 points first. Once you have them pinned, then fill in with additional pins to hold the bottom piece in place. The rectangle will NOT line up perfectly. Do your best to fit it in place.

You will need to adjust the 2” of fabric before the side seam pin on each end. Do your best to even it out.

Once you have the panel pinned in place, sew it. Use a 5/8” seam allowance.


Trim seam allowance to ½” around the entire seam.

Sew again to strengthen your seam. Once finished sewing the second seam, press the seam allowance toward the TOP of the bag. Thread your machine with the denim top stitching thread and sew a seam ¼” from the bottom seam. This will hold the seam allowance in place.


Upcycled Sewing Project Step 9: Adding Handles
Handles can be made from the remaining pant leg if you have enough denim fabric or by attaching 2 pieces of nylon bag webbing to the top. I opted for nylon handles.
Option 1: Denim handles
Cut 2 pieces of denim fabric 4 ½” wide by 33” long. Pin right sides together. Sew ½” seam along long side. Leave ends open. Turn tube right side out. You will need to use a tube turner tool for this step. Press seam flat. Sew a seam ¼” from the seam with the denim top stitch thread. Pin each handle to the original waistband section. Sew in place several times to secure it.
Option 2: Nylon webbing
Determine your desired handle length. Measure from the attachment points on the bag to ensure that you cut the correct length of nylon webbing. To prevent the webbing from fraying, you need to apply a small amount of ‘Fray Check’ to the ends.

Identify the attachment points on the INSIDE of the bag and place a mark with your washable marking pen or tailor’s chalk. Position the webbing INSIDE the bag with the raw edge facing down toward the bottom of the bag. I opted to line up the edges of my handle with the bottom of the waistband. Pin in place.
IT IS VERY IMPORTANT TO MAKE SURE YOU ARE NOT POSITIONED OVER ANY RIVETS OR METAL OBJECTS ATTACHED TO THE AREA!!!

Sew handles in place by sewing 1/8” from the edge of the strap. Make sure to sew each side, along the top and bottom as well as the diagonal. When finished, each attachment should look like an “X” sewn inside a box. If you prefer to remove the belt loops prior to sewing the handles in place, you may do so. This is a cosmetic preference and does not impact the functionality of the handles.

Upcycled Sewing Project Step 10 (OPTIONAL TAB)
Cut piece of denim 3 ½” wide by 7 inches long.

Fold lengthwise, right sides together. Sew a ¼” seam lengthwise and at one end. Turn tube right side out. You will need a tube turner or fast turn tool.
Press. Top stitch around flap with denim top stitch thread.
Measure the size of the button on your jeans. Mark a buttonhole on your tab that is 1/8” larger than the button.

Using the buttonhole stitch on your machine, sew a buttonhole. Use denim topstitch thread that closely matches the color used on the jeans. Once sewn, carefully cut open the buttonhole.
To properly position the tab on your new bag, lay bag flat on table and identify the center back. Pin tab INSIDE at the center back point. To confirm if you have the correct placement, unbutton existing buttonhole on waistband and use your tab. If the tab lines up, sew the tab in place along the back waistband. Use the same ‘box’ stitching pattern you used on the handles and the denim top stitching thread.

Once the tab is sewn, you are finished! If you prefer to strengthen your bag bottom, you can cut a piece of cardboard and place it inside. Just remember to remove the cardboard before washing the bag.

I hope this upcycled sewing project tutorial helps you upcycle a pair of jeans! If you have any questions, please leave them in the comments below.
Please note: This article does contain affiliate links.
We are a participant in the Amazon Services LLC Associates Program and its affiliate advertising programs which are designed to provide a means for us to earn fees by linking to Amazon.com and its affiliated sites.
There is no additional cost to you when you make a purchase through any of my affiliate links. Please consider supporting this blog.
CHRISTINE WARREN
Sewing isn’t just my job, it’s my passion. I’ve enjoyed sewing and needle working since I was very young.


